I use gpx.studio to review and create tracks on a map. It’s quite an intuitive app that’s freely available at https://gpx.studio/.
When reading the map, i have a 2 different uses that are quite different:
- Get a sense of the larger area: where are the mountains, larger cities, et cetera
- View all offroad tracks, better than paved roads
Both use cases require different maps. I like the ArcGIS National Geographic World Map for a beautiful high level map. For more detailed offroad oriented maps I like the Osmand Offroad style map or the 4UMaps topographic map.
WMTS to the rescue!
Good news is that gpx.studio supports Web Map Tile Service (WMTS) so that it can load different maps in addition to the ones already bundled. (thanks for the tip, Gravel seeker!). Here’s how you can do this:
- Open https://gpx.studio/
- Hover over the map icon on the right side, and click on the cog to open the map settings
- Enter a layer name, zoom level and add the tiles URL from the list below:
- 4UMaps:
https://tileserver.4umaps.com/{z}/{x}/{y}.png(maximum zoom level 15) - National Geographic:
https://server.arcgisonline.com/ArcGIS/rest/services/NatGeo_World_Map/MapServer/tile/{z}/{y}/{x}.png(maximum zoom level 12) - Osmand Offroad:
https://maptile.osmand.net/tile/offroad/{z}/{x}/{y}.png(maximum zoom level 20) - Osmand Touring:
https://maptile.osmand.net/tile/touring/{z}/{x}/{y}.png(maximum zoom level 20) - Kurviger liberty:
https://tiles.kurviger.de/v1/7c372aca/raster/styles/kurviger-liberty/{z}/{x}/{y}.webp(maximum zoom level 20) - Geoportail (France)
https://wxs.ign.fr/an7nvfzojv5wa96dsga5nk8w/geoportail/wmts?layer=GEOGRAPHICALGRIDSYSTEMS.PLANIGNV2&style=normal&tilematrixset=PM&Service=WMTS&Request=GetTile&Version=1.0.0&Format=image%2Fpng&TileMatrix={z}&TileCol={x}&TileRow={y}(maximum zoom level 19) - Carto voyager greyscale
https://b.basemaps.cartocdn.com/rastertiles/light_all/{z}/{x}/{y}.png(maximum zoom level 20) - Michelin
https://map.viamichelin.com/map/mapdirect?map=viamichelin&z={z}&x={x}&y={y}&format=png&version=202306091800&layer=background
- 4UMaps:
- Click ‘add layer’ and ‘save’
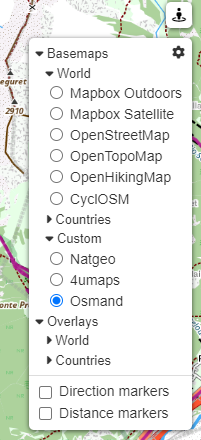
- Hover over the map icon on the right side, click on basemaps > custom and select the new map
Here you can see the differences between 4 maps at 2 different zoom levels:
Higher zoom level
These screenshots are at zoom level 9


Lower zoom level
These screenshots are at zoom level 14


